Monday, August 5, 2013
Hello everyone! For this post, I am going to try out
different layouts. I don’t have any user interface in mind, but I want to see
how the different layouts work with texts, buttons, or labels. To start, I am
going to create a new Android application project in Eclipse. Select File from
the main menu and select New -> Other. A new window will pop-up to select a
wizard. Select Android Application Project under the Android folder and click
Next. In the New Android Application window, I filled it out with the following
fields and clicked Next:
- Application Name: LayoutDemo
- Project Name: LayoutDemo
- Package Name: com.android.layoutdemo
- Minimum Required SDK: API 8: Android 2.2 (Froyo)
- Target SDK: API 17: Android 4.2 (Jelly Bean)
- Compile With: API 18: Android 4.3
- Theme: Holo Light with Dark Action Bar
 |
| New Android Application |
In the following window, select the checkboxes to create a custom
launcher icon, to create an activity, and to create project in workspace.
Configure the launcher icon any way you like. For my launcher icon, I chose the
following and clicked Next:
- Foreground: Clipart – Black star
- Selected Trim Surrounding Blank Space checkbox
- Additional Padding: 27%
- Foreground Scaling: Center
- Shape: Circle
- Background Color: Blue
- Foreground Color: Pink
 |
| Configure Launcher Icon |
In the next window, select the checkbox to create an
activity and select Blank Activity. Click Next. In the Blank Activity window, I
left the default values which are:
- Activity Name: MainActivity
- Layout Name: activity_main
- Navigation Type: None
Click Finish and wait for Eclipse to create the project.
After Eclipse is done, you can see the project LayoutDemo in the Project
Explorer and the file activity_main.xml opened in the Graphical Layout.
 |
| LayoutDemo Application |
As you
can see, the application is displaying the string “Hello world!” and the file
activity_main.xml looks like this:
<RelativeLayout xmlns:android="http://schemas.android.com/apk/res/android"
xmlns:tools="http://schemas.android.com/tools"
android:layout_width="match_parent"
android:layout_height="match_parent"
android:paddingBottom="@dimen/activity_vertical_margin"
android:paddingLeft="@dimen/activity_horizontal_margin"
android:paddingRight="@dimen/activity_horizontal_margin"
android:paddingTop="@dimen/activity_vertical_margin"
tools:context=".MainActivity" >
<TextView
android:layout_width="wrap_content"
android:layout_height="wrap_content"
android:text="@string/hello_world" />
</RelativeLayout>
The Java class RelativeLayout is one of the subclasses of
the class ViewGroup found in the package android.view. The package provides
classes for the user interface which includes screen layouts and ways for the
user to interact with them. The user interface that you design can have more than
one layout nested within another layout.
The Relative Layout lets you choose
where the objects will be located relative to each other. For example, there
could be an object right of another object or there could an object at the top.
The XML attributes used for this layout can be found here: XML Attributes
To test a few of this attributes, I am going to add to our
current activity_main.xml file. First, I add two new string resources. I do
this by going to the file strings.xml under the res -> values folder. I
added a string resource called first_name, which holds my first name as value,
and a string resource called last_name, which holds my last name as value.
 |
| strings.xml |
First
I will try this configuration,
<RelativeLayout xmlns:android="http://schemas.android.com/apk/res/android"
xmlns:tools="http://schemas.android.com/tools"
android:layout_width="fill_parent"
android:layout_height="fill_parent"
android:paddingBottom="@dimen/activity_vertical_margin"
android:paddingLeft="@dimen/activity_horizontal_margin"
android:paddingRight="@dimen/activity_horizontal_margin"
android:paddingTop="@dimen/activity_vertical_margin"
tools:context=".MainActivity" >
<TextView
android:id = "@+id/hello"
android:layout_width="wrap_content"
android:layout_height="wrap_content"
android:text="@string/hello_world" />
<TextView
android:id = "@+id/first_name"
android:layout_width="wrap_content"
android:layout_height="wrap_content"
android:layout_below =
"@id/hello"
android:text = "@string/first_name" />
<TextView
android:id = "@+id/last_name"
android:layout_width="wrap_content"
android:layout_height="wrap_content"
android:layout_below =
"@id/first_name"
android:text = "@string/last_name" />
</RelativeLayout>
The result is:
 |
| Graphical Layout - activity_main.xml |
As you can see, I am using resources of type id on each
TextView to identify which object is relative to another. The string resource
hello_world has id name hello, the string resource first_name has id name
first_name, and the string resource last_name has id name last_name.
The line android:layout_below = "@id/hello” on the second
TextView makes the string first_name display below the string
hello_world.
The line android:layout_below = "@id/first_name" on the third
TextView makes the string last_name display below the string
first_name.
Now, I will modify the third TextView:
<TextView
android:id = "@+id/last_name"
android:layout_width="wrap_content"
android:layout_height="wrap_content"
android:layout_below =
"@id/hello"
android:paddingLeft =
"9dp"
android:layout_toRightOf =
"@id/first_name"
android:text = "@string/last_name" />
The result is:
 |
| Graphical Layout - activity_main.xml |
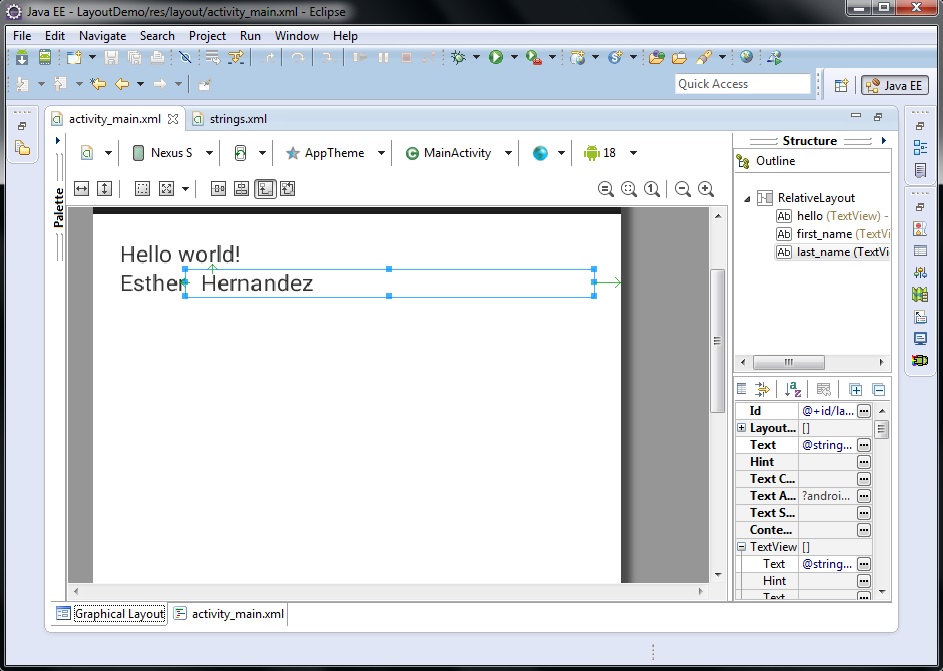
As you can see, I used the XML attribute android:layout_toRightOf to
specify that the string resource last_name goes to the right of the string
resource first_name. Also, I used the XML attribute android:paddingLeft to
specify a padding in pixels to the left edge of the last_name resource.
If I
put this line on the third TextView:
android:layout_alignParentBottom="true" will
result in:
 |
| Graphical Layout - activity_main.xml |
When this XML attribute is set to true, it will align the bottom
margin. As you can see, now the string resource last_name is aligned to the
bottom instead of to the right which would be:
android:layout_alignParentRight="true". This will
result in:
 |
| Graphical Layout - activity_main.xml |
There are more XML attributes which you can try. A list of attributes
can be found in the link mentioned before. On my next posts, I will try the
other layouts like LinearLayout, GridView, and ListView. Thank you for reading. Feel free to leave comments or follow me on Google+.


OK. Fine. But... Why are you use Windows Phone philosophy about design website?
ReplyDeleteBecause I like this layout. =)
Delete