Archive for July 2013
Android Virtual Device Configuration
Hi everyone! So far, I have configured a new Android
application project in Eclipse and taken a closer look at the Project Explorer.
On this post, I will do the configuration of the AVD. The Android Virtual
Device (AVD) is an emulator that will let you test the application on different
resolutions and sizes. The configuration will emulate an actual device with
specific hardware and software options. You can also use an actual device to
test you application. I will be using both the emulator and my phone which has
Android version 4.1.2 to test the application. Here is the window view that I
have so far for the HelloAndroid application.
 |
| HelloAndroid Eclipse Window |
To access the AVD Manager through
Eclipse, you need to select Window from the main menu and click AVD Manager
from the list of options. But as you can see, I didn’t have that option.
 |
| Eclipse Window View |
Instead, I chose Customize Perspective from the list of options under Window. I
clicked the Command Groups Availability tab and selected the Android SDK and
AVD Manager checkbox.
 |
| Eclipse Customize Perspective |
Then, I clicked Ok. On my toolbar, I can now see the
Android Virtual Device Manager.
 |
| Eclipse AVD Toolbar |
In the AVD Manager, you can configure different
virtual devices by selecting the hardware features you would like the device to
have. Examples of these features are device ram size, GPS, and camera. During
the configuration, you can also choose what Android platform will be running on
the virtual device. It is recommended to test the application on different
types of device configurations to make sure there are no problems when using a
different size, resolution or platform version. It is also important to keep in
mind the minimum SDK version chosen for the application because the application
will not run on the virtual device if the API Level chosen in the AVD Manager configuration
is less than what your application requires. To start the AVD Manager, click
the Android Virtual Device Manager icon in your toolbar. A new window will
appear called Android Virtual Device Manager.
 |
| Android Virtual Device Manager |
Click New to create a new AVD. A
window will appear where you will configure the new AVD.
 |
| AVD Manager |
I entered the
following information in the fields and clicked Ok:
- AVD Name: NexusS_4.2.2
- Device: Nexus S (4.0”, 480 x 800: hdpi)
- Target: Android 4.2.2 – API Level 17
- CPU/ABI: ARM (armeabi-v7a)
- Keyboard: checkbox selected
- Skin: checkbox selected
- Front Camera: None
- Back Camera: None
- Memory Options: Ram: 343, VM Heap: 32
- Internal Storage: 200 MiB
- SD Card: Default
- Emulation Options: Default
 |
| AVD Manager |
The new AVD configuration should now appear in the list of
the previous window.
 |
| AVD Manager |
You can create new virtual devices, edit, or delete them.
To launch the AVD click Start. A window will appear with launch options. I
selected the checkbox Scale display to real size and changed the Screen Size to
7.0 so it would fit in my screen.
 |
| AVD Launch Options |
Finally, I clicked Launch. The NexusS_4.2.2 AVD will start and we are done
with the new AVD configuration!
 |
| NexusS_4.2.2 AVD |
On my next post, I will run the application in
the NexusS_4.2.2 AVD and also on my phone.

Android Application Project Explorer
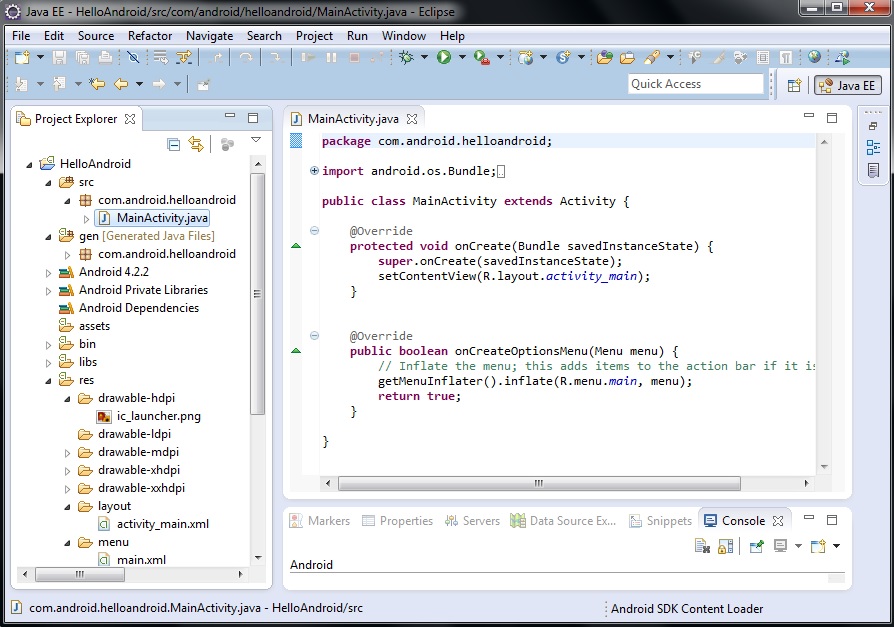
Hello everyone! On my last post, I configured a new Android application project in Eclipse. The view in Eclipse was like this after creating it:
 |
| HelloAndroid Application |
Now, I want to build and run the application.
Before I do that, I am going to take a closer look at the Project Explorer view in
Eclipse.
 |
| Eclipse Project Explorer View |
By configuring a new Android application project, it created various
folders and subdirectories. The first subdirectory shown in the Project Explorer view of Eclipse is called src. The source folder has a package and a Java class. The
package name is chosen in one of the first windows while creating a new Android
application. In my case, the Java class name is MainActivity.java.
 |
| MainActivity.java |
The name
depends on the name given while creating a new blank activity. An Android
application needs at least one activity and it can have more than one. The
following subdirectory in the Project Explorer view is called gen. The folder has a
package with two Java classes. The first Java class is called BuildConfig.java
and it is an automatically generated file which shouldn’t be modified. The
second Java class is called R.java.
 |
| R.java |
It is also an automatically generated file
which shouldn’t be modified. This class is generated by the aapt tool from the
resource data that was found in the application. These classes will automatically change as
modifications are done in the project. The following part in the Project Explorer is a set of libraries. The version of Android depends on what you
chose while creating the Android application project. Another important folder
called res in the Project Explorer contains several subdirectories. The first
few folders in the resource folder begin with the word drawable. These folders
have the launcher icon file that was selected while creating the Android application
project. In my case, it contains the graphic file ic_launcher.png which is the
green android logo in a black box.
 |
| ic_launcher.png |
This graphic file can be changed for another
graphic by adding the specific size in each of drawable folders. The following
folders in the Project Explorer have XML files.
 |
| Eclipse Project Explorer |
The files on these folders have
the configuration for the screens in the application. An important file after
the resource folder is the AndroidManifest.xml file.
 |
| AndroidManifest.xml |
This XML file contains
information about the application like the android version, minimum SDK
version, target SDK version, and activity. It also contains permissions for the
device like for example to allow an application to access information about
networks or to allow an application to access the camera.

Creating New Android Application Project
Hi again! Now I am going to make sure everything installed
works by building my first Android app. It will be a simple app which will
display “Hello Android” in the screen. Let’s get started! I launched Eclipse to
start a new Android project. To start a new Android project in Eclipse, you can
select File from the menu and then select New -> Other or just click the New
icon in the toolbar. I clicked the New icon in the toolbar. The New window will
appear to create a new project. The Android Application Project can be found in
the Android folder. Select Android Application Project and click Next.
 |
| Eclipse New Project |
After clicking Next, the New Android Application window appears.
 |
| Eclipse New Android Application |
The New Android Application window has the following fields:
- Application Name: This is the name of the application that will appear in the Play Store. This name will also appear in the Manage Application list in Settings.
- Project Name: This is the name of the Android project that will appear in Eclipse. It can be the same name of the application but it must be unique within the workspace.
- Package Name: This is the name of the application package. It follows the same rules as packages in the Java programming language. The name chosen must be a unique identifier across all packages installed on the Android system. It must stay the same for the lifetime of the application and it is typically the reverse domain name of your organization plus one or more application identifiers.
- Minimum Required SDK: This field is the lowest version of Android that the application will support. This is indicated by the API level. Lower API levels can support more devices, but fewer features are available. This should be set to the lowest version available that allows your application to provide all of its features, so the application can support as many devices as possible.
- Target SDK: This field is the highest version of Android in which your application was tested and known to work with.
- Compile With: This field is set by default to the latest version of Android available in your SDK. Setting this field to the latest version will enable new features for the latest devices. It is the target API against which you will compile the application.
- Theme: This is the base Android UI theme to use for the application.
For my application, I chose the following and clicked Next:
- Application Name: Hello Android
- Project Name: HelloAndroid
- Package name: com.android.helloandroid
- Minimum Required SDK: API 8: Android 2.2 (Froyo)
- Target SDK: API 17: Android 4.2 (Jelly Bean)
- Compile With: API 17: Android 4.2 (Jelly Bean)
- Theme: Holo Light with Dark Action Bar
On the next window, I left the default values and clicked
Next. The following window lets you configure the launcher icon.
 |
| Eclipse Configure Launcher Icon |
You can browse
for an image file, select clipart, or enter text to use as launcher icon. As
you are customizing your icon, you can see the icon it generates for all screen
densities on the right side of the window. For my application, I chose:
- Foreground: default image file
- Selected trim surrounding blank space
- Additional Padding: 13%
- Foreground Scaling: Crop
- Shape: Square
- Background Color: Black
After I was done configuring launcher icon, I clicked Next.
On the following window, select Blank Activity and click Next.
 |
| Eclipse Create Activity |
The new window
that appears has three fields which will let you enter an activity name, a layout
name, and navigation type for the activity. I left the fields on their default
value and clicked Finish.
 |
| Eclipse Blank Activity |
After Eclipse creates the new Android project, you
should have a new directory with the name of the project which you chose. You
can see this on the left side of Eclipse on the Package Explorer. The package name
which you chose should be seen in the src folder. In the package, you should
find the MainActivity class.
 |
| Eclipse IDE |
We are done creating the new Android application project! If you have any questions feel free to leave a comment. I will do my best to help you. On my next post, I will run the application.


Installation for Android Development
Since I already have Eclipse installed, I am going to use that existing IDE for Android development. All I need to download is the SDK Tools. The Android SDK has the API libraries and everything needed to build, test and debug apps for Android. If you are new to Android development you can download the ADT (Android Developer Tools) Bundle. The ADT Bundle has Eclipse + ADT plugin, Android SDK Tools, Android Platform-tools, the latest Android platform, and the latest Android system image for the emulator. The download can be found here: Android SDK. The download for Eclipse IDE can be found here: Eclipse IDE
After downloading the SDK Tools, the executable file starts the installer.
The installer will first check if the JDK (Java SE Development Kit) is installed. It will install it if necessary.
Then, it will ask for which users you want to install Android SDK Tools. After selecting, click Next.
On the following window, choose the install location. Remember this location because when setting up the ADT plugin, you will need to refer to this directory.
Select Install. After installation is complete and you are using Eclipse IDE for Android development, do not start the Android SDK Manager. The next step is to download the ADT Plugin for Eclipse. Start Eclipse and select Help. Then select Install New Software.
Click Add and enter the following in Name ADT Plugin and Location https://dl-ssl.google.com/android/eclipse/.
Select the checkbox next to Developer Tools and click Next. After reading and accepting the license agreements, click Finish.
After installation is completed, restart Eclipse. When Eclipse restarted, I was supposed to get a window that said “Welcome to Android Development” where the option Use existing SKDs needed to be selected. Then you need to select the directory to where u downloaded the Android SDK. The window did not appear for me. Instead, I went to Window and selected Preferences.
Afterwards, I clicked Browse and selected the location of the Android SDK directory.
Then I executed the Android SDK Manager which can be found in the Android SDK directory. The SDK Manager provides all the packages to add to the Android SDK. Select the checkboxes Tools folder, first Android version folder, and Android Support Library found on the Extras folder.
After selecting all the necessary packages, click Install. When the installation is completed, I will be ready to build my first app!
In case you get stuck in one of the installation steps, here is a very nice tutorial on the installation of the ADT Bundle:
'
After downloading the SDK Tools, the executable file starts the installer.
 |
| Android SDK Tools Setup |
The installer will first check if the JDK (Java SE Development Kit) is installed. It will install it if necessary.
 |
| Android SDK Tools Setup |
Then, it will ask for which users you want to install Android SDK Tools. After selecting, click Next.
 |
| Android SDK Tools Setup |
On the following window, choose the install location. Remember this location because when setting up the ADT plugin, you will need to refer to this directory.
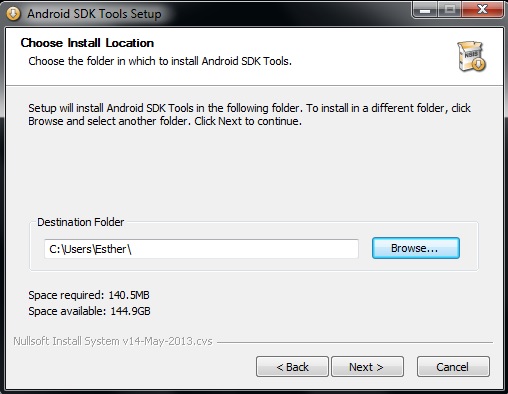 |
| Android SDK Tools Setup |
Select Install. After installation is complete and you are using Eclipse IDE for Android development, do not start the Android SDK Manager. The next step is to download the ADT Plugin for Eclipse. Start Eclipse and select Help. Then select Install New Software.
 |
| Eclipse Install New Software |
Click Add and enter the following in Name ADT Plugin and Location https://dl-ssl.google.com/android/eclipse/.
 |
| Eclipse Install New Software |
Select the checkbox next to Developer Tools and click Next. After reading and accepting the license agreements, click Finish.
 |
| Eclipse Install New Software |
After installation is completed, restart Eclipse. When Eclipse restarted, I was supposed to get a window that said “Welcome to Android Development” where the option Use existing SKDs needed to be selected. Then you need to select the directory to where u downloaded the Android SDK. The window did not appear for me. Instead, I went to Window and selected Preferences.
 |
| Eclipse Preferences |
Afterwards, I clicked Browse and selected the location of the Android SDK directory.
 |
| Eclipse Android Preferences |
Then I executed the Android SDK Manager which can be found in the Android SDK directory. The SDK Manager provides all the packages to add to the Android SDK. Select the checkboxes Tools folder, first Android version folder, and Android Support Library found on the Extras folder.
 |
| Android SDK Manager |
After selecting all the necessary packages, click Install. When the installation is completed, I will be ready to build my first app!
In case you get stuck in one of the installation steps, here is a very nice tutorial on the installation of the ADT Bundle:
About Blog
Hi everyone! My name is Esther. I am a recent graduate with a bachelor in computer science because programming is my passion and so is learning. Every day I spend time reading about new technologies and learning about advances in this field. I love learning about everything! What can I say? I am a technology lover. One thing that especially has caught my eye is Android development. So, what is Android?
Android is a Linux-based operating system currently being developed by Google. It is open source software which allows developers to write applications and deploy them to the app store called Google Play. The Google Play store grows every day and with billions of downloads up to date the applications are limitless. On May 2013, it was announced there are 900 million Android activations and 48 billion apps have been installed from the Google Play store.
How amazing is that! I am very interested in learning about Android and I created this blog to share what I am learning and also to use it as a reference. I’m a beginner, so feel free to guide me by leaving comments or by asking any doubts you have. I will do my best to help. I’m excited to get started!


