Saturday, July 20, 2013
Since I already have Eclipse installed, I am going to use that existing IDE for Android development. All I need to download is the SDK Tools. The Android SDK has the API libraries and everything needed to build, test and debug apps for Android. If you are new to Android development you can download the ADT (Android Developer Tools) Bundle. The ADT Bundle has Eclipse + ADT plugin, Android SDK Tools, Android Platform-tools, the latest Android platform, and the latest Android system image for the emulator. The download can be found here: Android SDK. The download for Eclipse IDE can be found here: Eclipse IDE
After downloading the SDK Tools, the executable file starts the installer.
 |
| Android SDK Tools Setup |
The installer will first check if the JDK (Java SE Development Kit) is installed. It will install it if necessary.
 |
| Android SDK Tools Setup |
Then, it will ask for which users you want to install Android SDK Tools. After selecting, click Next.
 |
| Android SDK Tools Setup |
On the following window, choose the install location. Remember this location because when setting up the ADT plugin, you will need to refer to this directory.
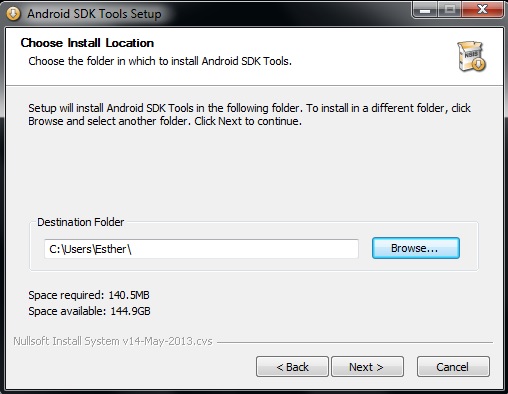 |
| Android SDK Tools Setup |
Select Install. After installation is complete and you are using Eclipse IDE for Android development, do not start the Android SDK Manager. The next step is to download the ADT Plugin for Eclipse. Start Eclipse and select Help. Then select Install New Software.
 |
| Eclipse Install New Software |
Click Add and enter the following in Name ADT Plugin and Location https://dl-ssl.google.com/android/eclipse/.
 |
| Eclipse Install New Software |
Select the checkbox next to Developer Tools and click Next. After reading and accepting the license agreements, click Finish.
 |
| Eclipse Install New Software |
After installation is completed, restart Eclipse. When Eclipse restarted, I was supposed to get a window that said “Welcome to Android Development” where the option Use existing SKDs needed to be selected. Then you need to select the directory to where u downloaded the Android SDK. The window did not appear for me. Instead, I went to Window and selected Preferences.
 |
| Eclipse Preferences |
Afterwards, I clicked Browse and selected the location of the Android SDK directory.
 |
| Eclipse Android Preferences |
Then I executed the Android SDK Manager which can be found in the Android SDK directory. The SDK Manager provides all the packages to add to the Android SDK. Select the checkboxes Tools folder, first Android version folder, and Android Support Library found on the Extras folder.
 |
| Android SDK Manager |
After selecting all the necessary packages, click Install. When the installation is completed, I will be ready to build my first app!
In case you get stuck in one of the installation steps, here is a very nice tutorial on the installation of the ADT Bundle:


